This post was last updated on August 8th, 2021 at 07:13 pm
Setting your fly rod and reel cn seem overwhelming, but with the right steps, it becomes a simple process. This task is easy if you know a few knots and should only take a couple minutes to accomplish. There are a few things you will need in order to get your fly reel ready for action. You’ll need the following items for your fly reel setup:
How to Set up a Fly Reel and Rod
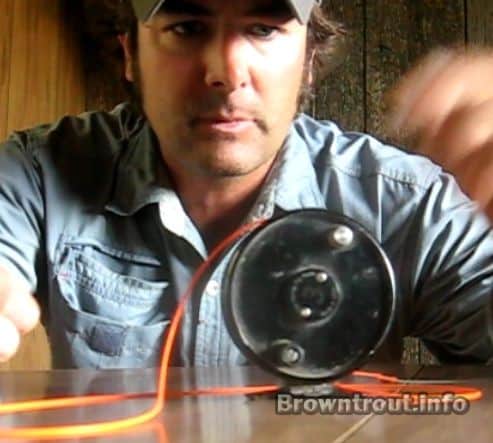
Make sure your fly reel is set to your desired dexterity. Most reels are capable of being set either right or left handed. If you have questions on how to change a particular reel, you can read through the documentation that came with your reel, or leave me a comment below. This videos explains how to setup a fly reel including how to put line on a reel, tying fly line to the backing and more.
Check out this video about how to tie fishing line to a reel
Step 1: Tying Backing to Reel Knot
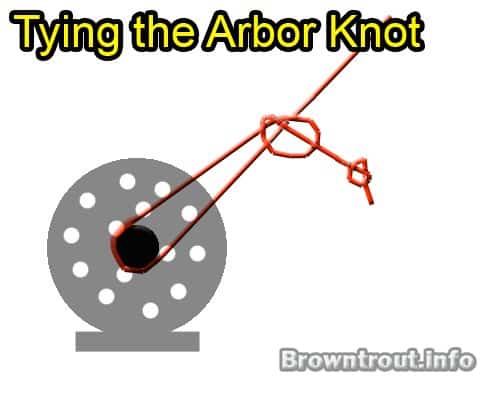 Tying your backing to reel knot is easy! To do this you will need to tie an arbor knot. This is one of the most simple knots used in fly fishing and can be done quickly and easily by anyone. It is simply 2 overhand knots.
- Wrap your backing around the arbor of your reel
- Tie a simple overhand knot around the backing
- Put a small knot in the end of your backing line to prevent the knot from slipping off (see image)
Spool onto your reel the desired length of backing. You will usually be able to find the proper amount in the documentation that came with your reel. The standard amounts are usually 50 or 100 yards. You can get by with 50 yards if you cannot find any information on your exact reel. Fly lines are almost all different diameters so this is almost always a guessing game anyway. If you put too much backing on your reel, you will overload it and won’t be able to reel. For trout fishing situations and smaller reels, 50 yards should do. This will be 50% of most spools of backing line.
Further Reading:
Step 2: Tying Fly Line to Backing Knot
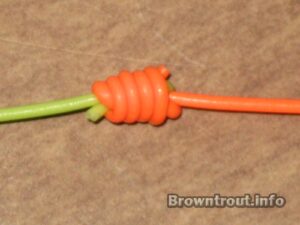 Now that your backing is successfully attached to your reel, you will need to tie the albright knot to tie your fly line to backing. This is another fairly easy knot that you will find in the instructional video. This knot is complicated to explain in a simple diagram, however I have included one below for your convenience. This knot is an important step to get right, because most people will at one time or another end up having a fish pull them into the backing line. If your knot fails, you will be out 2 valuable things, the fish and your expensive fly line.
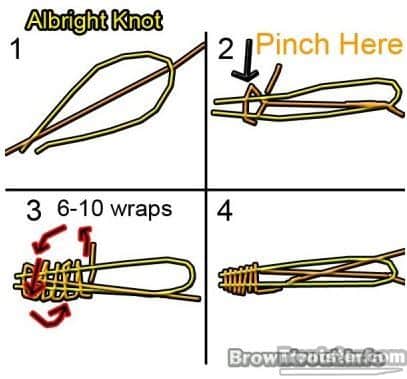 While tying the albright knot I generally only wrap the backing (or smaller diameter line) around 5-6 times. I have found that a lot of people will wrap this 10 times! I have found less to be more in this case. I am sure if you only have confidence in this knot it you wrap ten times then by all means do it that way. I have tested this knot for many years with some very large fish and found 6 wraps to be the perfect amount. I am not saying 10 wraps is wrong, I just wanted to show how I do it.
Further Reading:
- All about fly line backing
How to Put Line on a Reel
Once this is completed, we can move on to the final steps of how to put line on a reel. These next steps depend on whether your fly fishing line came with a loop in it from the factory, or if it’s just a cut end (as shown in the video).
If it has a pre-formed loop you are almost done tying your fly fishing line to the reel!
Making a Loop to Loop Connection
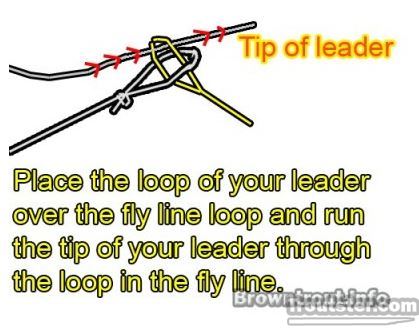
This is a very simple procedure. You simply put one loop over top of the other loop and place the end of your leader through the innermost loop. This is your final step of putting line on a fishing reel if you have a loop in your fly line. If you would like assistance tying tippet to your leader, see this article about how to tie a blood knot.
The Finishing Touches to Setting Up Your Fly Reel
To finish off adding your leader to your fly line, you can do it a couple different ways. You can tie an albright knot (as shown above) or you can tie a nail knot. The potential advantage of a nail knot is it’s slightly slimmer size than the albright. It will slide through the guides of your fly rod much easier. The albright knot is however easier to tie.
Tying the Nail Knot:
This knot can be tricky. You can purchase a nail knot tying tool to make this easier. It is possible to tie this using a straw or many other objects. With a little practice you can tie the nail knot without using any other object to assist, however there is usually something around that can help. The nice thing is, you will rarely have to tie this knot once you have line on your reel. It is best to leave a section of your old leader on when it comes time to change, this will allow you to just tie the new leader to your old one using either the loop to loop or a blood knot.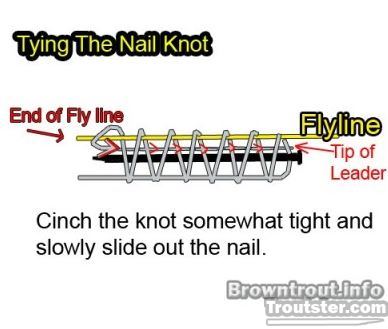
Summary: Fly Reel Setup
I hope this has assisted you in your questions about how to put fishing line on a reel. We’ve discussed how to setup a fly reel in depth including tying backing to reel, tying backing to fly line, how to put line on a reel and more. Of course, your final knot will be the clinch or cinch knot to tie your fly onto your tippet. If you haven’t watched the video above, it will certainly fill in any blanks I have missed in this article.
Thanks for stopping by! For more information on how to tie fishing knots used in fly fishing go here.

